Sunday, September 7, 2014

Static Discipline

There are two ways to present data and information: analog and digital. The analog system typically represents the data in the form of a continuous wave which is easily interrupted and polluted by external noise. The digital system shows the data in two distinct states: 1 and 0. This creates a square wave which is much more resistant to noise.

Since digital devices are made by a variety of different manufacturers a set of development criteria have been created to ensure that devices made by different manufacturers will be able to communicate smoothly and efficiently. This criteria is called "Static Discipline" and states that if inputs meet the valid input thresholds (VIL --> VIH) then it is guaranteed that the outputs will meet the valid output thresholds (VOL ---> VOH). The "noise margin" is defined as the absolute value of the difference between the forbidden region voltage threshold for the reciever and the prescribed output voltage for the logic value.

Click here for example problems

Thursday, September 4, 2014

Logic Gate Simulation Arduino Activity

I did a really fun simulation activity to help cement my understanding of Logic Gates:

AND Gates


OR Gates


NOT Gates


NAND Gates


Wednesday, September 3, 2014

Boolean Algebra

Hi all, we have been learning some Boolean Algebra in my Computer Architecture class and I thought I would share what I have learned so far. As always, if you have any questions or comments please share them below.

Boolean Algebra is the subset of Algebra formulated by English mathematician George Boole. In "normal Algebra" the variables are numbers and the main operations are addition, subtraction, multiplication and division. But, in Boolean Algebra the values of the variables are true and false (1 and 0) and the main operations are "and" (^), "or" (v) and "not". Now, why is this significant? How is Boolean Algebra useful and why couldn't we just use Algebra? Well, the laws of Boolean Algebra are mainly used to describe circuits whose state can either be true or false (1 or 0). Boolean Algebra differs from Algebra because the values of true and false are represented by binary digits (bits) that do not behave like normal integers (think about the NOT, AND, and OR gates in my previous post). Don't get confused, in Boolean Algebra the 1 and 0 do NOT behave like normal integers, they represent true and false.

Boolean Postulates:

  1. 0 . 0  = 0
  2. 0 + 0 = 0
  3. 1 . 1 = 1
  4. 1 + 1 = 1
  5. 1 . 0 = 0 . 1 = 0
  6. 0 . 1 = 1 . 0 = 1

Boolean Laws:

AND ( . )
OR ( + )

Every law has a part (a) and a part (b) this is called duality and is done by switching every AND for an OR and every 1 for a 0 (inverting it).

  1. Commutative Law
    • (a) A + B = B + A
    • (b) A . B = B . A
  2. Associate Law
    • (a) (A + B) + C = A + (B +C) 
    • (b) ( A . B ) . C = A + (B . C)
  3. Distributive Law
    • (a) A (B + C) = A . B + A. C 
    • (b) A + (B . C) = (A + B) . (A +C) 
  4. Identity Law
    • (a) A + A = A
    • (b) A . A = A
  5. Redundance Law
    • (a) A + A . B = A
    • (b) A . (A + B) = A

Tuesday, September 2, 2014

How to launch and run a Java program/servlet automatically on Tomcat Server startup

Over the weekend I did some serious server side optimization and I really wanted to have a servlet launch when my server restarted. I wasn't sure how to do this, but I was sure it was possible. After looking it up, I realized its quite simple. So to save you some time I have explained it below :)

To run a servlet automatically on Tomcat Startup you have to use a servlet that is initialized to startup automatically. We do this in the deployment descriptor web.xml file in WEB-INF. 
To create a web.xml file for your package follow the directions below:
  1. Go to your Dynamic Web Project and right click
  2.  Select Java EE Tools and choose to Generate Deployment Descriptor Stub.


The web.xml file must contain tags <load-on-startup> and <servlet>. The Servlet tag will store the information of Servlet class. When tomcat starts, all the Servets load and the "init" method of the servlet runs first. This can be convenient for initialization of variables or setting up data structures. 


Monday, September 1, 2014

Logic Gates

I am currently taking a Computer Architecture course and my teacher explained Logic Gates in class. I did not really understand them so I came home and looked into them further. I found some links and took some notes that I think explain them quite well. Good Luck and comment if you have any questions!

AND Gate:


The AND gate has an output that is normally at logic level 0, but goes HIGH to logic level 1 when all inputs are at logic level 1.

"If both A and B are true, then Q is true"


Helpful Links:
http://www.electronics-tutorials.ws/logic/logic_2.html

OR Gate:

The output of an OR gate is true if one or more if the inputs are true, but if all are false it outputs false.


Helpful Links:
Check out a live simulation: http://logic.ly/lessons/or-gate/

NOT Gate: Digital Inverter


The NOT gate is a single input device that has a normal output level of 1 and goes LOW at logic level 0 when an input is of logic level 1. So, it inverts the input signal. 


"If A is not true, then Q is true"


Helpful Links:
http://www.electronics-tutorials.ws/logic/logic_4.html

NAND Gate:


The NAND gate is a combination of the AND gate and the NOT gate (NOT + AND = NAND). It only produces an output when any of its outputs are NOT present. So, this means that it will only return true when any of its inputs are false. 


"If either A or B is not true, then Q is true"
Helpful Links: 
http://www.electronics-tutorials.ws/boolean/bool_4.html
http://www.electronics-tutorials.ws/logic/logic_5.html

Saturday, August 30, 2014

Integrating Eclipse with Git


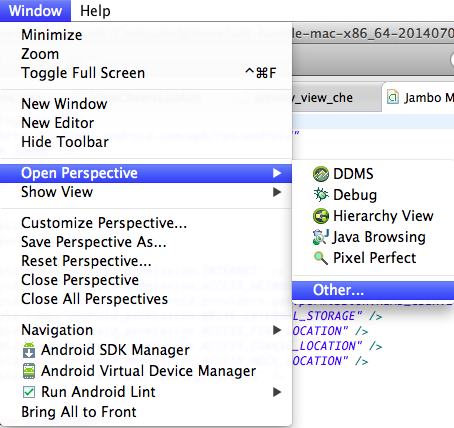
Customize Your View:

Go to Window --> Open Perspective --> Other --> Git


Connecting to a Local Git Repo:

  1. Right Click on Project --> team --> Share Project 
  2. Select Git 


  3. Choose "Use or create .." and choose your package. 
  4. You have now created the .git file all your source changes will be saved in!
Importing from a local repo:

  1. Right click on project --> import --> git --> projects from git
  2. Select Existing Local Repository and choose the one you want to import from!


Connecting to and importing from an already existing GitHub Repo:
  1. Right Click on Project 
  2. Click import 
  3. Select Git --> Projects from Git 
  4. Select Clone Url 
  5. Go to your GitHub account and get the url for the repo and enter your information as it asks. 
  6. Click finish and you are good to go!


Helpful links:
http://wiki.eclipse.org/EGit/User_Guide


Installing Eclipse and the Android SDK


You want to start developing apps. Good for you! Getting up and running may seem a little intimidating, but don't worry this post will make your set up process much smoother.

This is a step by step tutorial for Eclipse Users:

  1. Go to this link and select "Eclipse ADT" (ADT stands for "Android Developer Tools". This bundle will provide you with everything you need to get started including the Android SDK tools and a version of the Eclipse IDE with a built-in ADT.
  2. Now click on "download the Eclipse ADT bundle now"
  3. Once you have downloaded the bundle unzip the file named "act_bundle-<os_platform>.zip" and save it to a directory. 
  4. Then open the directory named "act-bundle-<os_platform>/eclipse" and launch eclipse  
  5. Great Job! Now you are up and running, but there are still a few steps you may need to complete. You now have all the Android developer tools, but there are a few Android SDK packages you need to download to make it complete. 
  6. To begin downloading packages visit the Android SDK Manager in Eclipse by going to the menu bar --> Window --> AndroidSDKManager
  7. When you open the manager, some packages will be selected by default LEAVE THEM SELECTED. But, make sure you check to see that you download the latest tools and Android Platform.  To do this open the tools directory and select the "Android SDK Tools", "Android SDK Platform Tools", and the highest version of the "Android SDK Build Tools".
  8. Make sure you also get support libraries for additional APIs by opening the Extras folder and installing the "Android Support Library" which gives you a larger set of APIs that are compatible with most Android versions.
     
  9. If you want to use the Google API you need to make sure to install the GooglePlayServices Package. To do this go to extras --> and select GooglePlayServices and GoogleRepository
  10. Once you have selected all the packages you want, click install. Double click each package name and agree to the terms and conditions, and click install again. MAKE SURE TO NOT EXIT THE SDK MANAGER WHILE INSTALLING, it will cancel the installation. 
Now you are all set up! Get coding!

SUBSCRIBE

Pages - Menu

Pages

top social

SUBSCRIBE

About